
In one of our previous articles – Facebook marketing guide for online teachers – part 1 we looked at Facebook as an advertising tool. We discussed the main objectives of Facebook ads, as well as the types of ads that are suitable for promoting an online course.
As we mentioned before, some of the most appropriate ad campaigns for marketing an online course through Facebook are Traffic and Lead Generation campaigns. Now it’s time to explain how you can create a Traffic campaign from beginning to end.
Creating a Traffic Campaign in Facebook
Once you are logged into your Facebook profile and you have your Business page set up, you can create a campaign from the Create Ads button; this is located in the options that appear after you click on the small triangle button in the upper right corner of your profile.
You will then be transferred to a page where you are supposed to choose your campaign objective. For the purpose of this article, we will choose to create a Traffic campaign. After you select it, go ahead and name your campaign (for example, you might want to name it Mathematics_Matriculation_course_Traffic_01 May) and then you will be directed to the Ad Sets window.
I will pause here and briefly explain the structure of a Facebook campaign. A Facebook campaign contains:
- Objective – general for all ad sets and ads
- Ad Sets – you will want to create different sets for your different audiences. This is the step where you will also decide what your budget, bidding, placement, and schedule will be. Ad sets may vary for the types of target audiences, but the objective of all of them is the one you set up in the beginning.
- Ad – this is actually your copy and creative (text and image) of the ad that will be shown to your target audience. You can create multiple ads for your ad sets, which is recommended because in this way you will be able to test which creative works best for you and which one does not.
Going back to the Ad Sets window – the first thing that you need to do is name your ad set. Let’s say that you are promoting an online preparation math course for a final exam. You will have two target audiences here: the first will be the students in the 11th and 12th grades and the second will be the parents of those students who may be interested in your ad for their children. In this case you will want to create two separate ad sets – let’s name the first one: Students_11-12_Grade.
The next step will be to choose where you want your potential clients to land once they click on your ad. You can choose among three options – Website, App, or Messenger. If you have a personal blog, we recommend that you send people to a relevant landing page on your page and select the Website option. If you do not have a blog, you can select the Messenger option and send the people to your Messenger where they can directly ask you specific questions.
Let’s say that you want to send your audience to an article on your personal blog and you stick with the Website option. The next steps are about how to define your audience.
There are three main types of audiences:
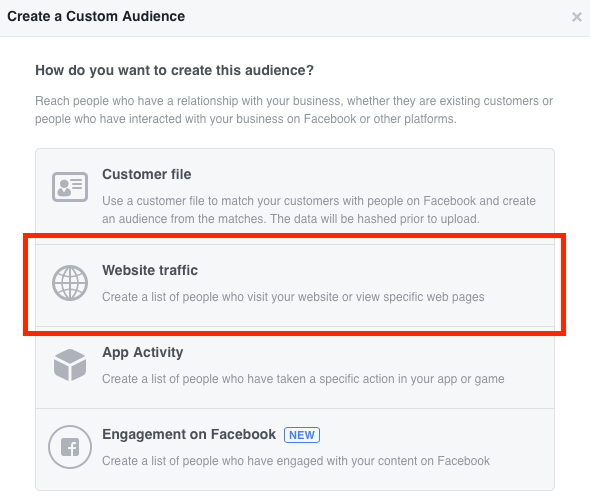
- Custom Audiences – this is an audience that you define. You can either upload a list of emails or phone numbers and match them with Facebook users or use the audience information that your Facebook Pixel has gathered. You can find detailed information about custom audiences on AdEspresso Blog.
- Look-alike Audiences – simply put, lookalike audiences consist of new people who are likely to be interested in your business because they are similar to your best existing customers.
- Saved Audiences – if you use some audiences often, you can make them saved audiences and save yourself time when creating your next campaign. Learn how to create saved audiences here.
Of course, you always have the option of creating a brand new audience and saving it. You can do this by selecting the audience’s location, age, gender, and language. You can select certain countries and cities or choose to pin a specific area using the drop pin option. For the purpose of this exercise we will create a brand new audience and target the United Kingdom, people from the age of 16 to 18 (who are supposedly in the 11th or 12th grade), and we will not define their gender.
Targeting
The next button you will come across is Detailed Targeting and it gives you very interesting options to further zero in on the people you want Facebook to show your ad to. You can choose specific demographics such as education level, relationship status, and field of work, as well as select a specific interest that people may have. In our Traffic campaign we will want to target students from the age of 16 to 18 and we may select the following targeting criteria:
- Demographics – education > Undergrad year
- Interest > Mathematics
- Field of study > Mathematics
Once you have completed the detailed targeting you can narrow down your audience even more by Excluding people you want to show your ads to. For example, you can now exclude parents as an audience since you are going to have a separate ad set for them. Connection is a tab that also allows you to further define your audience.
Placements
Placements is an option that either lets Facebook automatically decide where to show your ads in places where they are likely to perform the best or lets you choose your placements manually. Depending on the objective of your campaign we suggest that you manually choose your placements. You can find more about the types of placements in this article.
Budget and Schedule
The final step in setting up an ad set is to decide on the budget, schedule, and bid strategy. Since this is your first campaign, we will choose the daily budget option and will set a start and end date for your campaign. Once you become more familiar with the ad options in Facebook, you will be more confident in setting up Lifetime campaigns as well.
We will leave Facebook to optimize delivery for Link clicks and will choose to get charged per Link click – this means that every time someone clicks on your ad you will be charged.
While you are setting up your campaign, you can refer to the approximate estimate of your audience reach and daily results that are visible on the right side of your screen.
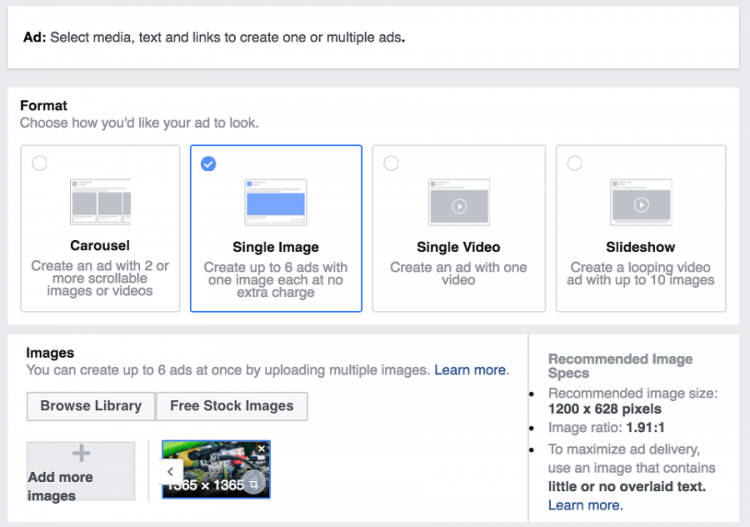
Ad Creative and Text
The next step is to identify the format of your ad and select the Facebook page you want your ads to show from. You can then select an image for your ad with the specific image specifications shown on the right side of your screen.
There is a ton of information about creating top selling images for Facebook advertising, so we will probably devote one of our next articles to this topic.
For right now, you can select an image that corresponds to the page where you will send your users after they click on your ad.
And here comes the most important part of your ad – the text. The copy of your ad is the tool that you will use to attract your audience, so think carefully when you create it. Think about your audience’s needs and desires, as well as their interests and problems and how you can resolve those problems. When you speak to teenagers, try to speak their language by doing a little bit of research about some of the common phrases and words that they use so that your ad can catch their attention.
You will also want to define the page (website URL) where you will send your audience, which in your case will be your personal blog or a separate landing page that you have for the specific course you are advertising.
The last step is to choose your Call to Action – what do you want the people to do: learn more, make an offer, shop now, etc.
At the end of your ad creative you will see the tracking options that you can use through Facebook Pixel, which again is too broad a topic to be discussed here and we will devote a separate article to it in the future. Once you are done you can Review your ad and then Confirm it.
4 Tips When Creating a Facebook Campaign
Since this may be your first time creating an ad in Facebook, it may seem challenging and puzzling; however once you start doing it regularly, it will become routine for you. To sum up the process we described in detail above, here are our top 4 tips for creating an ad in Facebook:
- Define your audience clearly before you start your campaign.
- Focus on your objective rather than trying to achieve several goals with one campaign.
- Pay attention to your image and copy as they are the keys to selling your course.
- Monitor the performance of your ads and optimize them.