Participant Controls in the Virtual Classroom Table of content
- Participant Controls in the Virtual Classroom
- Virtual classroom: Control all participants’ menu
- Sound Controls
- Online Whiteboard Controls
- Presenter Controls
- Chat Controls
- Individual Video Controls
- Video mosaic Controls
- Upload Box Controls
- Virtual classroom: User Logs
- Virtual classroom: Participant list
- Virtual classroom: Participant list controls
The participant controls in the Virtual Classroom menu allow you to control what any individual or all of the participants can do in the room. You can turn participants’ cameras and microphones on or off, as well as control their access to the chat, online whiteboard, files, etc.
The menu is located in the lower right corner of the virtual classroom, you have to press the “Participants and Groups” icon and there you can see the list of all participants currently in the room. You have two options to control the participant’s permissions – you can do it by changing settings for all participants or by changing settings for an individual participant.
Virtual classroom: Control all participants menu
This menu gives tutors the option to control the settings for all participants currently in the virtual classroom.
By clicking on the microphone and/or camera icon on the top of the Participants panel the host enables/disables the function for all the participants, excluding his.

Click on the gear icon to open the menu. The menu consists of Control all participants as well as Individual Controls.

The Control all section controls affect all the participants in a certain group.
The (Green) slider icon allows particular permission for all participants.
The (Grey) slider icon stops particular permission for all participants.
The Individual Controls section affects only a particular participant.

Sound Controls
There are two types of controls – for speaking and listening. You can also find both types of controls in the Participant’s Controls.
Allow microphone – this permission switches on/off the microphone. When switched off the participant is muted. To mute all participants at once, move the slider icon (Grey).
Allow speakers – (Speakers/Headphones) – this permission controls whether or not the participant can hear the others in the room. When stopped the participant can no longer hear the other participants in the room. He/she can still speak and thus be heard by the other participants. To mute all participants at once, move the slider icon (Grey).
Online Whiteboard Controls
There are three controls for the online whiteboard – for access, writing, and for editing other participants’ elements.
Allow Whiteboard – this permission hides/shows the online whiteboard. When stopped the participant cannot see the content on the online whiteboard, nor can he/she write or draw. To hide the online whiteboard for all the participants at once, move the slider icon (Grey).
Write on the Whiteboard – this permission controls whether or not the participant can write on the online whiteboard. When stopped the participant can see the content on the online whiteboard but cannot interact, draw or write on it. To stop all participants from writing at once, move the slider icon (Grey).
Export the Whiteboard Content – this permission will allow the user to export (to PDF) the content on the whiteboard. To deny all participants from exporting the content on the whiteboard, move the slider icon (Grey).
Edit Objects Created by Others – this permission controls whether or not the participant can edit other participants‘ elements on the online whiteboard. When stopped the participant cannot edit other participants‘ elements on the online whiteboard, write simultaneously in the text editor with other participants, or use the UNDO/REDO functions. To allow all participants at once, move the slider icon (Green).
Presenter Controls
Presenter – this permission provides/takes away the ability to be a presenter in the room. This permission assigns a presenter role to a specific participant. As such he/she will be able to toggle the Presentation mode, share YouTube videos and other media in the Media player, share files on the online whiteboard, or create and edit online whiteboard sheets.
Chat Controls
Chat in the waiting room – this permission switches the chat in the waiting room on/off. To hide this option for the participants and to prevent any unnecessary distraction (due to incoming chat messages from the waiting room) for the host you can set this option to off (Grey).
Allow Chat – this permission hides/shows the chat. When stopped the participant cannot see the content in the chatbox but can still write and send private messages. To hide the chat for all participants at once, move the slider icon (Grey).
Write in the chat – this permission controls whether or not the participant can write in the chat. When stopped the participant can see the content in the chatbox and cannot write in the Group chat. To stop all participants from writing at once, move the slider icon (Grey).
Note: Even if Write in the chat is disabled the participants can still chat with the host via the personal chat, but not with the other participants.
Personal Chat with Others – this permission controls whether or not the participant can send private messages to other participants. When stopped the participant cannot send messages to the other participants but can still receive messages from them. This permission is unitary (works for all groups created in the room).
Individual Video Controls
Individual video – this feature can show one participant in an individual video window. By default, all participants are shown in the video mosaic, only the host will be shown in the individual video. However, if the host wishes he/she can show one participant in the individual video window removing his/her’s video stream from this window. The host can still be present in the mosaic if the Attendance in the Video mosaic mode is switched on in the host’s individual settings menu.
Note: The individual video is the only video window that can support HD video, this setting is controllable by the host only, and can be used only with devices that support HD video.
Video mosaic Controls
Attendance in the Video mosaic – this permission shows/hides the participant in the Video mosaic. When stopped the participant is not shown in the grid. By default, the host is not present in the Video mosaic. When the internet connection is slow or interrupting it is recommended to show the host in the grid and stop his/her individual video. To forbid all participants from showing up in the Video mosaic at once, move the slider icon (Grey). This permission is local (works only in the current group).
Screen Share Controls
“Allow participants to send screen sharing requests”
This option can be accessed in the Settings menu.
With it, the Host can choose if the Participants can send screen sharing requests or not.

NOTE: This option is turned ON by default.

This is the visualization for the Participants when they are allowed to send screen-sharing requests.

This is the visualization for the Participants when they are not allowed to send screen sharing requests.
Request user’s screen
Any participant can request to share their screen (using the button at the bottom screen), and this will result in a notification received by the host. On the other hand, the host can request a particular participant to share their screen.
In every breakout room (group) there could be a different screen share set by the host. Also, there is a possibility of two-screen shares being active at the same time – the hosts and one of the participants’.
You can find more detailed information about how Screen Share works by checking Individual video and Screen Share in the Virtual Classroom article.
Disable Notifications (from Participants)
The participants themselves can disable all notifications if they want to. In order to do so, they need to go to the bottom of the screen, press the “three dots” button (More Tools), and then go to the Notifications section. There, they can disable (and afterward enable) all notifications.

Upload Box Controls
There are two controls for the Upload box – for downloading files and uploading files. These permissions are LOCAL.
View Files – this permission denies/allows the participants to view the files in the Upload box. When denied the participants will not see any files in the upload box and the message “You have no permission to view the files” will be displayed instead.
Upload from Computer (Uploading) – this permission denies/allows the participant to upload files in the Upload box. When stopped the participant cannot upload files but can still download them and see the file information. By default, this permission is not allowed. To allow all participants to upload files at once, move the slider icon (Green).
Download files (Downloading) – this permission denies/allows the participant to download the files in the Upload box. When stopped the participant cannot download files but can still see the file information. To stop all participants from downloading files at once, move the slider icon (Grey).
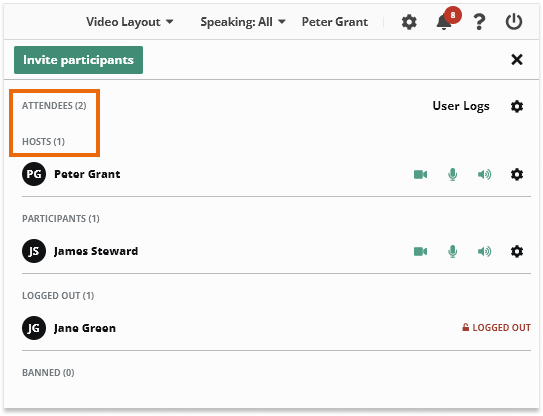
Virtual classroom: User Logs
The User Logs menu can be accessed (only hosts as well as admin role bearers) through the icon located on the lower right side of the screen right next to the Invite participants menu button.
This will open the User Logs window which contains information regarding all the users who are in the room, as well as those attempting to enter it:

You may find additional information on each participant entering the room, as well as their status, connection, and technical specifications, by clicking on the Info button on the right side of the log.
The Error indicator will let you know if the participants are experiencing or experienced errors during the system check.
Clicking on the information button allows you to see further information about the participant.
Further details will appear as shown here:

To refresh the logs and follow the login progress and status of your users in real-time during each step of the system check, click on the button. Use the “refresh” button to refresh the logs to their current state.

Virtual classroom: Participants list
The participant list is located directly under the Control all participants menu on the lower right-hand side of the screen. The participant’s list will include every student who has joined the Virtual Classroom.

The list displays all participants who have entered the room, as well as their current status in one of several ways:
Expand/collapse the participant list
The participant list is collapsed by default but it can be extended using the participants’ icon on its left side or by the X sign to improve visibility in the virtual classroom.

Invite participants
The Invite Participants button on top of the participant list allows you to invite participants to the session via email. The way this is done is identical to the way you would do it when opening the room.

Once clicked, a new window will open allowing you to enter the email address(es) of the participant(s) you would like to invite to the session. Type the desired email address and click Invite now. They will receive an invitation with an access link within several seconds.

Virtual classroom: Participants list controls
You have access to the same participant controls as in the Control all menu through the Participant list control menu. The difference is that, unlike with the Control all menu, any changes you make here affect only the participant you have selected. You can open the menu by clicking on the name of a particular participant in the list. Some unique functionalities are available through the Participant list which allows you to switch the presenter role, and Ban participant, which immediately bans the participant from the room. Only the tutor can use these controls.
Banning a participant
The following window will appear prompting your confirmation:

Click Yes, if you want to ban a student from your Virtual Classroom or Cancel altogether. Once you click on (Yes) the participant will be logged out and a notification of the action will be shown in the notifications list. Participants whom you have banned will see the following screen:

Unban a participant
In order for one to be unbanned, the host needs to go to the All Participants list, and find the name of the banned participant (it will be in red and at the bottom of the list). Right next to the name there will be a padlock. Pressing this padlock will unban the participant. After that, the participant needs to refresh the page, thus entering the session.

Participants counter in the Virtual classroom
There are two icons located above the participants’ list – a green and a red one with numbers beside them. They indicate the state of the users – whether and how many of them are online or offline. The number of the participants, who are present in the session at that moment, will be shown in green and all of the users who joined the session and later left, will be indicated in red (including the banned and disconnected ones). These two indicators are only visible to the host (or any admin present in the session).
Distraction
When a participant opens or moves to another browser tab, or opens another program or application on their device, an indicator will appear on the bottom left corner of their video in the video mosaic. In this way, the host (teacher) will know if someone is not looking at the virtual classroom tab.
Furthermore, this indicator will appear on the participant’s name section in the “Participants list.”
The host, as well as the other participants, can see these indicators.
Note: The distraction indicator is yellow and shows that the participant has left the virtual classroom’s tab, but the tab is still active and they can hear if someone is talking in the room. When someone has left the room, the indicator is red.
Please check the screenshot below for more information about the status(es) of the users in the Virtual Classroom.